
SAE & Classic Correct 4 Prong Wiring
Before this tutorial, ensure you have read and installed flyback diode tutorial.
This tutorial is to confirm that your machine matches the wiring of the OEM four prong (L14-20R) often found on Classics and SAE's for the supplied dk rheostat receiver.
If you have a third party 5 Prong installed, read the next tutorial.
Failure to confirm or follow the steps to be mentioned may void warranty.
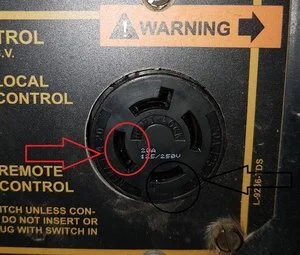
picture to the left indicates the two prongs we are to use The one in circled in RED is the (Y) prong. The Y is tied to the negative of the bridge rectifier by way of wire 600. The one in circled in BLACK is the (W) prong. The W prong in good order is often attached to the blue wire of the main shunt coils by way of the remote switch

These two wires could in theory be switched around and still work with an oem 150 watt Rheostat 64 ohm resistor. However, with this receiver, it requires to be installed correct to oem and maintain ground on the Y prong.
To measure or confirm, a multimeter set to measure dc voltage can confirm the polarity. Red probe on the slot opposite the only l-shaped slot. And the negative probe on the slot which is next to the flat part of the l-shaped slot. best I can explain it. Working properly, your measurements will be positive. In my case 57vdc at low idle, 120vdc at high idle. As well, you can confirm that the measurement goes away if the remote toggle switch is set to local.
Failure to have these in this wiring scenario, will result in receiver damage.